Drag the hotspot with the mouse, select the hotspot image in the window that opens.
Enter the name of the hotspot (appears when the mouse hovers over the hotspot).
Advanced settings - the ability to change the scale, transparency, rotations along the x,y, and z axes, and make your own actions in onover, onhover, onclick, and onout.
Assign a hotspot to open a photo.
Assign a hotspot to open a video file with a control panel (time line, display of the current and total time).
Create a video hotspot.
Assign a youtube opening to a hotspot.
Assign an audio file opening to a hotspot. Enabling directional 3D sound.
Assign a hotspot to open a URL link in a new window, in the current one, in the frame.
Insert a part of the image extracted in PTGui. It does not require editing the code, the coordinates are recalculated automatically.
Create text hotspots.
Create polygonal hotspots.
The presence of a hotspot search bar by its name.
Edit and save hotspots created by a non-plug-in (for example, the krpano navigation arrows).
Editing and saving without editing the code in an xml file.
Create an image hotspot or a text hotspot or a polygonal hotspot.
Adjust their parameters such as size, position, color, etc.
Assign the action of opening photos, videos, etc. to clicking on a hotspot from the preset options in the plugin tabs.
You can assign multiple actions at the same time, for example, open a photo and play audio.
You can write your own code for different hotspot events (clicking, pointing, dragging the mouse, etc.
The hotspots are created locally and, when saved, are registered inside the scenes.
You can edit the hot spots created by a non-plugin and save their changes.
Reload the tour - the editor panel will disappear.
When placing on the server or transferring the tour to the customer, delete the editor folder "editor" which is located along the path add_hotspot/plugins_l.
For example, your main file is test.xml and you want to place the folder with
the
plugin in the skinfolder.
Put the "add_hotspot" folder in the skin folder and write it in the
"test.xml" file.
For ease of operation, the panel is moved with the mouse. Clicking on the triangular button collapses
and unfolds the panel.
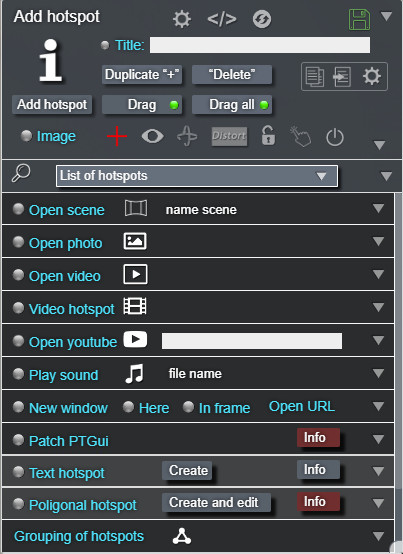
Button assignment:
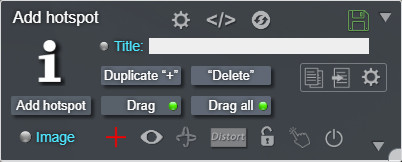
Add hotspot - create a hotspot. A hot spot will appear in the center of the window with the pre-selected image.
- Open the hotspot attribute settings panel.
- Open a window with the hotspot code.
- display the scene code in the window.
- display the entire xml file code in the window.
Saving hot spots.
If backup is enabled, you will be prompted to save a copy first.
"tour.xml - backup-2021.12.14-12.20.52.xml" where the date and time will be specified, followed by
you will be prompted to save "tour.xml" with created hotspots. Replace the existing file
"tour.xml" to the proposed one. If the file name is different, then the one you want will be substituted. specified
You can disable saving a backup copy in a fileadd_hotspot/plugins_l/plugin_a/style_addon.xml by installing backup="false"
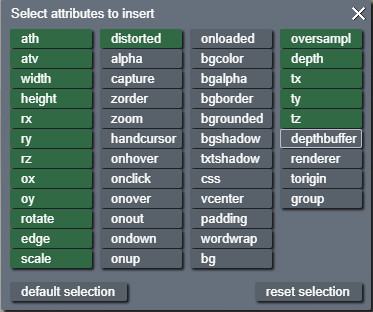
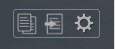
- Selective copying of attributes.
- selecting the attributes to insert. Clicking this button opens a list of attributes. Enable/disable the necessary attributes for copying.
-copy the attributes of the selected hotspot (Ctrl+C).
- paste the copied attributes (Ctrl+V).
Drag - blocking/unblocking the movement of an active hotspot.
Drag all - blocking/unblocking the movement of all created hot spots.
Title -if necessary, enter a description of the hotspot (by default the hotspot name is displayed). Click on the round button (or on the "Title"). It will turn green - the description will be appear when hovering the cursor over a hotspot.
Image icon - click on the icon to open a window to select the hotspot image. The images should be placed along the path "add_hotspot/picture".
- turn on/off the crosshair for easier positioning of the hotspot being created.
- delete the selected hotspot. The "Delete" hotkey.
- sets in hotspot enabled=false . The hotspot is disabled and does not respond to the mouse.
If you collapse and expand the editing panel, enabled will be set to true and the text will be editable again.
- block the hotspot from editing. The hotspot will not be dragged with the mouse. Changes hotspot settings will be disabled.
- - temporarily disables the action of all hotspots (on over, on out, onclick, ondown, onup, onhover), which will allow you to work with hotspots safely (for example, when you click it, it will not send you to another scene). Does not disable attributes specified in the style as
".addevent"
- creates a copy of the selected hotspot. The "+" hotkey.
-enable/disable distortion.
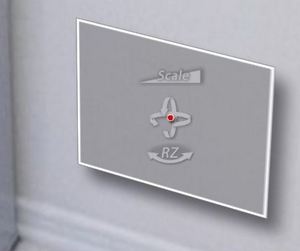
- show/hide the joystick on the hotspot.
The joystick appears on the hotspot's nodal point. Click and move the cursor left/right - rotation on the "x" axis (attribute "rx"). Offset cursor up/down - rotation along the "y" axis (attribute "ry").
There is a z-axis rotation button under the joystick. To change it, click and move the cursor left/right (the "rz" attribute).
Zoom button above the joystick - press and move the cursor left/right (the "scale" attribute).
By grabbing the triangle at the bottom right, you can expand the panel. Additional tabs will open.
The tabs are in a collapsed state and are expanded by clicking on the triangle or the name inside the tab.
Tabs are needed to assign an action when clicking on a hotspot and to create text, polygon, and video hotspots. The tab is selected by pressing the corresponding round button, the button will turn green. When you click on a hotspot, the corresponding tab becomes active.
The list includes all global hotspots and local hotspots of the open stage, including
hot spots that are not created by the plugin.
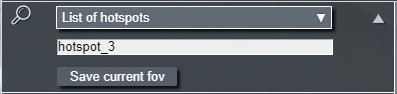
List of hotspots - drop-down list of hotspots.
Hovering over the name in the list takes a look at this hotspot. Clicking on a name in the list activates it and the name appears in the search bar.
Search - hotspot search bar.
Enter the symbols contained in the hotspot and press "Enter". The hotspot will become active for editing.
When you click on hot spots (activation), the hotspot's name will appear in the search bar. It available for copying via keyboard shortcuts (Ctrl+C).
By default, a hotspot image is created without assigning any actions to it. In the tab
"Manual setings (direct input)"
you can set its parameters manually.
How to change parameters:
Select a hotspot by clicking on it, name of edited
access point appears on first line. Edited hotspot is moved by mouse
and positioning coordinates are immediately displayed on corresponding buttons. Clicking in an empty place on screen resets selection!
Changes to parameter are made by pressing left mouse button and moving it to the left
(decrease the parameter) and to the right
(parameter increase). Farther the mouse is moved away from click location, when faster
parameter changes.
The changes are directly applied to hotspots and you can be visually controlled result.
Parameters that have two states (on or off) switch by clicking on button.
Clicking on button highlights it with a green frame, direct keyboard input becomes available
- numbers (right on keyboard), percentage ("5" button of top row of keyboard).
Backspace clears the numeric value on the button.
Selected parameter is also displayed in the line above buttons, where you can edit/delete,
copy, paste. To enter, press "Enter" button.
You can also edit local hotspots. Make changes and open the active hotspot settings window.
Copy the changed parameters and paste into the hotspot.
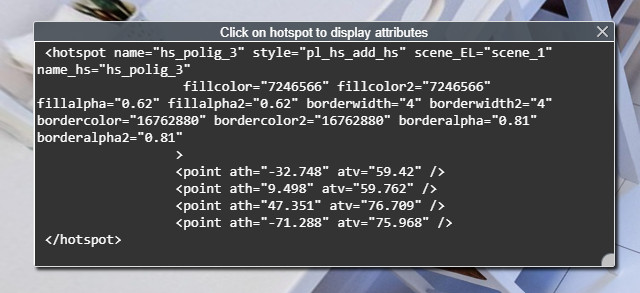
Attribute window - open a window to display the parameters of the active
hotspot.
Select a hotspot by clicking on it - its attributes will be displayed in this window. You
can select and copy parameters by pressing "Ctrl + C".
The size of the window can be changed by grasping the lower right corner. The text inside
the window is automatically distributed across the width.
The window can be moved by grasping the top.
Entering parameters in the window is not possible.
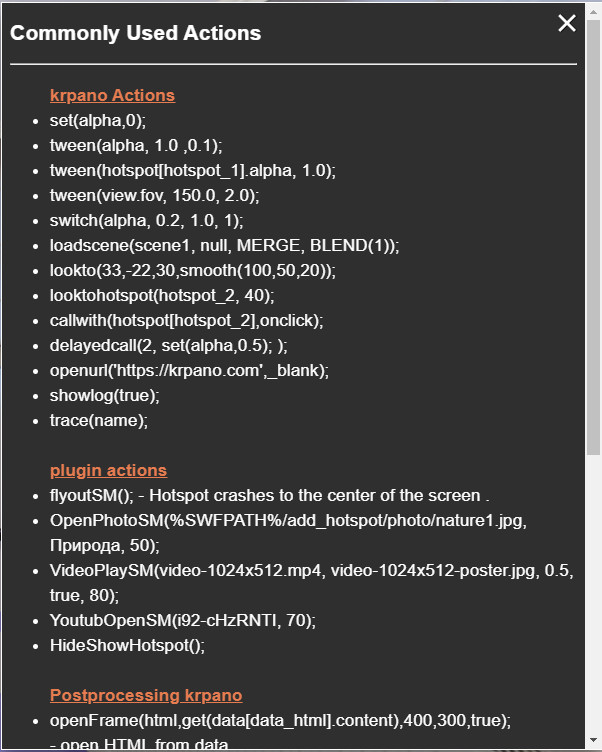
Action list - open a window with a list of frequently used actions.
You can use it as a draft, you can copy ("Ctrl + C"), paste ("Ctrl + C") actions.
The list is along the way add_hotspot/plugins_l/actionSM.html - you can fill in
the required information.
Info "action" - opens the Krpano website with background information on
actions
and functions .
Info "hotspot" - opens the Krpano website with background information
about settings
of hotspot.
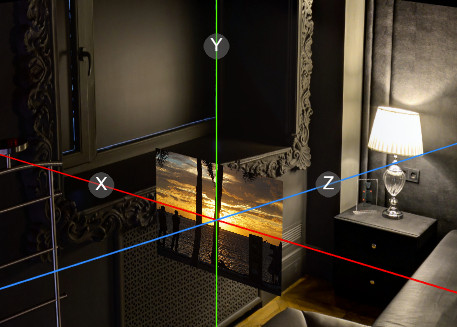
- Show 3D coordinates and invert control controls.
This tool should be used when working in a 3D model or with depth maps. When you launch
it, the model center view from the outside changes. The X Y Z coordinate axes are set.
When creating a hotspot in this mode, the following attribute values are set:
ath=0
atv=0
depth=0
distorted=true
Moving the hotspot with the mouse is blocked. The position of the hotspot in space
changes in the Cartesian coordinate system by changing the parameters tx ty tz. There
are round buttons on the axes. Click on the button and drag - the hotspot will move
along this axis.
Hotspots with 3d coordinates are created in the 3D model, in this case, the attribute
depth=0.
Dragging the hotspot with the mouse in the 3D model takes place according to the coordinates
tx ty tz, if depth=0.
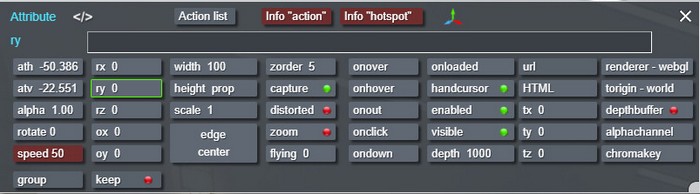
ath - horizontal coordinate (-180...180). atv - vertical coordinate (-90...90). alpha - change alpha (0 - 1). rotate - rotate (-360...360). speed - changing speed of main parameters from 0 to 10. rx
- rotation around its own x axis (in degrees). ry - rotation around its own axis y (in degrees). rz - rotation around its own axis z (in degrees).
ATTENTION! parameters "rx", "ry", rz
" are changed only when the parameter "distorted" is enabled".
ox - offset along «x»-axis (in px). oy - oy - offset along «y»-axis (in px). width - width change (pixels.) The value of "prop" is proportional (by
default, pixels). height - height change (pixels). The value "prop" is proportional (by
default "prop"). To enter the "prop" value, press the "p" key. scale - changes scale of hotspots. Press and move mouse in the pressed
state to the left ( zoom out) or to the right (zoom in). edge - positioning (9 variants). zorder - display sequence number (visibility). A higher value brings to
the foreground (1-100). capture - mouse capture. if the value is" false", clicking on the hot spot
and shifting to the side does not prevent moving the panorama (true/falce). distorted - on/off distorted hotspot. zoom - should the size of the hotspot image change together with the pano
when zooming. flying - this setting interpolates automatically the ath/atv and scale
values to the current viewing values. The value range is from
0.0 to 1.0. At 1.0 the hotspot image will be locked always to the middle to screen and
it's size will be relative to 1000 pixel in screen height.
actions/functions to be called when.
onover - user hovered the mouse pointer.
onhover - user hovered the mouse pointer, called 15 times per second
while cursor over the hotspot.
onout - user has removed cursor from the hotspot.
onclick - user clicked on the hotspot.
onloaded - the hot spot is loaded.
handcursor - show hand when hovering hotspot (true/falce). enabled2 - all generated hotspots are global and the values "enabled" and
"visible" become active in the scene that is listed in the hotspot.
If enabled2="falce", then regardless of the prescribed scene hotspot will be turned off.
In edit mode enabled2="true" (true/falce). visible2 - if visible2 = "falce", then regardless of the registered scene,
the hotspot will be invisible. In edit mode visible2="true" (true/falce). depth - the internal 3D rendering depth - that's the distance of the 3D
object to the screen.
For 2D viewing this has no visible effect, but for stereo 3D/VR viewing this can be
important setting. E.g. use smaller values for a stronger 'pop-out' effect.
When a hotspot image should be infinity far away (like the pano image itself, e.g. to
pixel-perfectly match the pano-background) then an 'invalid' value
(e.g. a String like "off") should be used for the depth setting - e.g. depth="off".
url - the path/url to the hotspot image file. html - the text (in the text of the hotspot). tx - 3D x offsets (only available for distorted hotspots). ty - 3D y offsets (only available for distorted hotspots). tz - 3D z offsets (only available for distorted hotspots). renderer - the visualization for the hotspot (webgl/css3d). By default -
"webgl" torigin - the position of the access point. world - the position of the hotspot is "global" / "world».
This means that the position will always be the same, regardless of the panorama or the
user's viewing position. image - the position of the hotspot will be relative to the current position
of the
panoramic image. view - the hotspot position will be relative to the current viewing
position.
By default - "world". depthbuffer - when this option is enabled, hotspots can cross other
hotspots
(with deepbuffer = true) or depth map geometry in 3D space (true/falce). alphachannel
- Setup the alpha-channel / transparency-channel usage and source.
For images and videos.
Usage case: there is currently no browser-support for transparent videos, so as
alternative a video with the alpha-channel as extra image on the right (Side-by-Side) or
at the bottom (Top-Bottom) can be used.
Example chromakey -
With the chromakey setting a certain color in the hotspot image or video can be used as
alpha / transparency mask. The typical usage would be Greenscreen or Bluescreen videos.
Example.
Pressing "Backspace" button clears the digital value of the attribute on button.
More information on assignment of hotspot attributes can be obtained on website
krpano. group - assign or change group of the
hotspot. keep - make a hotspot local or global. When set to
"true", the hotspot will appear in the panorama where it is registered and will not
disappear when switching to other panoramas.
To assign any action to a hotspot click, first select the hotspot by clicking on it (a red dot will appear on the hotspot and the hotspot name will appear in the panel), then open the necessary tab (open photos, videos, audio, etc.), the round indicator will turn green in the tab, set the necessary parameters (select a file, adjust the volume, etc.).
If any action (from the plugin panel) is set in the hotspot, then when you click on the hotspot in the corresponding tab, the round indicator will turn green.
If necessary, you can delete this action by clicking on the trash icon in the tab.
Create a hotspot and activate it by clicking on it (a red dot will appear).
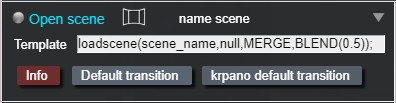
Activate the tab by clicking Open scene.
Click on the thumbnail and select the desired scene from the drop-down list by clicking on the thumbnail of the scene.
Now the created hotspot will open the selected scene when clicked.
Template is a template for opening a scene. By default, "loadscene (scene_name,null,MERGE,BLEND(0.5));".
You can set your own scene opening values by entering them in the line. You can't change it. the variable of the stage name "scene_name".
Info - help on "loadscene" action on site
krpano .
Default transition - when clicked, default template is set.
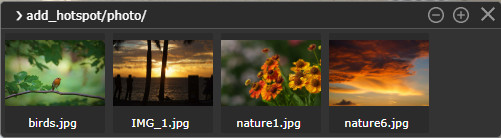
Pre-place the photos in a folder add_hotspot/photo/.
Create and configure a hot spot.
Activate the tab by clicking Open photo. Click on the thumbnail and in the
explorer window that opens, select an image from the folder add_hotspot/photo/.
Clicking on the created hotspot will open the selected image.
When you hover over the image, it is zoomed in by rotating the mouse wheel. The zoom occurs
relative to the cursor position.
If the photo is larger than the viewing window, then a thumbnail of the photo with the selected
viewing area will appear in the lower right corner.
By shifting the viewing area, the photo moves accordingly.
The photo is moved with the mouse or finger on mobile devices.
In VR mode, the image opens as a hotspot.
Text below photo - enter a caption for the photo displayed under the open photo.
You can customize the style of the caption text in the file "add_hotspot/plugins_l/plugin_a/style_addhs.xml"
Height relative to window - the height of the window relative to the screen in percentage. A photograph will open no larger than its true size!
Clicking on an empty space closes window - close the window by clicking in an empty area of the screen.
You can use the action of opening a photo even with the editor disabled. Set it to some action. The code: OpenPhotoSM(path, signature, height in %);
path - full path to image location, e.g.: %SWFPATH%/photo/test.jpg
signature - image caption displayed above open photo.
height in % - the height of the window relative to the screen in percent (specify without the "%" icon). A photograph will open no larger than its true size!
Pre-place the video file in a folder add_hotspot/video/.
Create and configure hotspot.
Activate the tab by clicking Open video. Click on the
"Play" thumbnail and in the Explorer window that opens, select the video file
from the folder
"add_hotspot/video/".
Volume at start - set the desired video volume when playing with the
slider or by entering a numeric value from 0 (min) to 1 (max).
Default - 0.5.
Loop - select the play mode. Green light - looped, gray - play once.
Select a poster image - images (typical screen shot of the first video
frame), which should be displayed until the video is loaded
and will not be ready to play.
Height relative to window - the height of the window relative to the
screen in percentage.
Clicking on an empty space closes window - close the window by clicking
on the blank screen.
At the moment of launching the video file, a hint appears on the right (in the video playback
window) for a few seconds. At the time of playback, 15% of the width of the window to
the right is the volume control zone.
On mobile devices, slide your finger up and down to adjust the volume.
Adding a poster is highly recommended! The poster image must have the same pixel
size as the video itself!
All parameters are local and tied to the edited hotspot. For another hotspot, set your own
settings.
Clicking on the created hotspot will open the selected video file.
Krpano video player is used to play video. Videoplayer.
In VR mode, the video opens as a video hotspot.
You can use the action of opening a video file, even with the editor disabled. Set it to some
action.
Video and poster must be in folder add_hotspot/video. The code: VideoPlaySM(video file name, poster file name, volume, loop, video window
height);
video file name - example: test.mp4
poster file name - example: test.jpg (recommended)
volume - the value is from 0 to 1. (optional, default is 1).
loop - play video in a loop - true/false (optional, default is false).
video window height - the height of the video relative to the height of
the browser window in percent without the sign "%" is 0/100 (optional, default is 90).
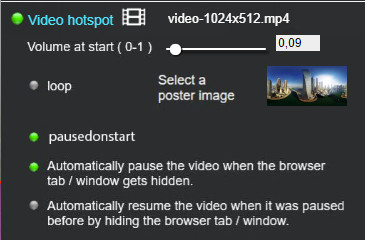
Pre-place the video file in the add_hotspot/video/ folder.
Activate the tab by clicking Video hotspot. Click on the icon and in the
Explorer (provider?).
window that opens, select the video file from the "add_hotspot/video/"
folder. Volume at start - set the desired video volume when playing with the
slider or by entering a numeric value from 0 (min)
to 1 (max). The default is 0.5. Loop - select the playback mode. Green indicator - looped, gray - play
once. Select a poster image - an image (a typical screenshot of the first video
frame) that should be displayed until the video is loaded and ready to play.
Adding a poster is highly recommended! The poster image must have the same
pixel size as the video itself! pausedonstart - Suspended at the beginning. Automatically pause the video when the browser tab/window gets hidden. Automatically resume the video when it was paused before by hiding the browser
tab/window.
All set parameters of the local and bound to the editable hotspot. For another hot spot,
set your own settings.
Example of creating a video hot spot.
YouTube
Create and configure a hotspot.
Activate the tab by clicking Open youtube.
Select a video on youtube and click "share". A link will appear, for example
https://youtu.be/mMpWL8XM2-k.
Copy code after slash mMpWL8XM2-k and paste in the row, click
"Enter"
By clicking on the hotspot, a window opens with video from youtube.
Youtube video window won't open in VR mode! Height relative to window - the height of the window relative to the
screen as a percentage without the "%" sign. (optional, default is 90). Clicking on an empty space closes window - close the window by clicking
in a blank area of the screen.
You can individually use the action of opening youtube, even with the editor disabled. Set
it to some action.
The code: YoutubOpenSM(link, youtube window height);
link - link to youtube. Use the link code as described above!
youtube window height - the height of the window relative to the screen as
a percentage without the "%" sign (optional, default is 90).
Create paired audio files, for example "sound1.mp3" and
"sound1.ogg", browser will automatically select
desired one. Pre-place the
audio files in the folder add_hotspot/sound/.
Create and configure a hotspot. Activate tab by pressing Play
sound. Click on icon "sound"
and that opens in window , select the audio file with extension "mp3" from folder
"add_hotspot/sound/" Volume at start - set the start volume of the sound with the slider or by
entering a numerical value from 0 (min) до 1 (max).
The default is 0.5. In "3D sound" mode, this value is maximum volume.
Loops - enter number of repetitions. A value of 0 is a constant
repetition. Directional 3D sound - enable directional 3D sound with respect to
hotspot. When you turn from hotspot vertically and horizontally,
volume decreases. Range of the sound - range of sound in degrees. If you deviate from the
hotspot by this amount, the volume decreases to zero.
Clicking on the hotspot will start playing the file, the hotspot image will be replaced by
the speaker icon. Clicking on the speaker stops the sound and sets the former
picture.
During audio playback, a sound control panel appears. Play/pause - stop, play sound. Speaker - click - turns on/off sound. Hovering the cursor opens a panel with a slider to adjust the volume. Time line - informs about the current playback time. Grabbing the strip you can move the moment of playback. Time - shows the current and total playback time.
At the moment of launching the video file, a hint appears on the right (in the video playback window) for a few seconds. At the time of playback, 15% of the width of the window to the right is the volume control zone. On mobile devices, slide your finger up and down to adjust the volume.
You can individually use the audio opening code with the control panel. Set it to an event. Code: play_soundSM(sound name, url, volume, loop);
sound name - use the name "sound_hs_addhs" and when you play another sound, this one will be turned off. If you choose a different name, then the sound will be played simultaneously with the other running ones. For disable it, you will need to use an action with this name. For example: stopsound (name).
URL - full path to the audio file.
volume - playback volume(0-1).
cycle - play continuously(true) or once(false).
For example: play_soundSM(sound_hs_addhs, 'add_hotspot/sound/2.mp3',0.5, false);
Additional settings in the file add_hotspot/plugins_l/plugin_a/style_addhs.xml
New window - open link in new window (Flash, HTML5).
Here - open link in current window (only HTML5).
In frame - to open a link in a frame (window in a window). Unfortunately,
it does not work on IOS yet (only HTML5).
To select, click on the selected option, indicator will turn green.
Choose a hotspot and enter address of site to open (or copy "Ctrl+C" and paste
into line "Ctrl+V"),
press "Enter".
You can try entering links here.
This tab allows you to ideally place part of image (pixel per pixel) extracted from
panorama.
How to extract part of image is described in detail on
krpano
forum, i recommend to carefully read!
Next, edit it at your own discretion (insert open door, change color of object, etc.). And
you can insert an image using this tab without
xml code edits. Inserting an image:
Place edited image along path add_hotspot/picture/.
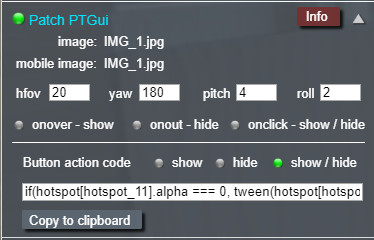
Activate tab by clicking Patgh PTGui.
Select created earlier image by clicking on icon "Select image" and create
a hotspot by tapping "Add hotspot" .
In tab on "image:" the name of selected file appears.
If image is large, create a smaller copy for mobile version, click on"Mobile
image" and select this image.
If you extracted an image as described in krpano
forum,
then you should have these settings saved:
"hfov","yaw","pitch","roll".
Enter these parameters into
corresponding cells, each time pressing "Enter".
If you have done everything correctly, image will be clearly aligned with your place in
panorama.
If necessary, select desired predefined actions, activate by clicking on name (indicator turns
green):
onover-show - when you hover mouse, image appears smoothly.
onout-hide - on out mouse - image faded away.
show/hide - clicking on image will toggle visibility.
Button action code - if you create a button to control visibility of image, you
can generate a visibility control code for
created image and paste it into button:
show - show image.
hide - hide image.
show/hide - toggle visibility.
When selected action is activated, corresponding code appears in line, use it for your
button. Copy to clipboard - copy the contents of the line to the clipboard for subsequent
insertion.
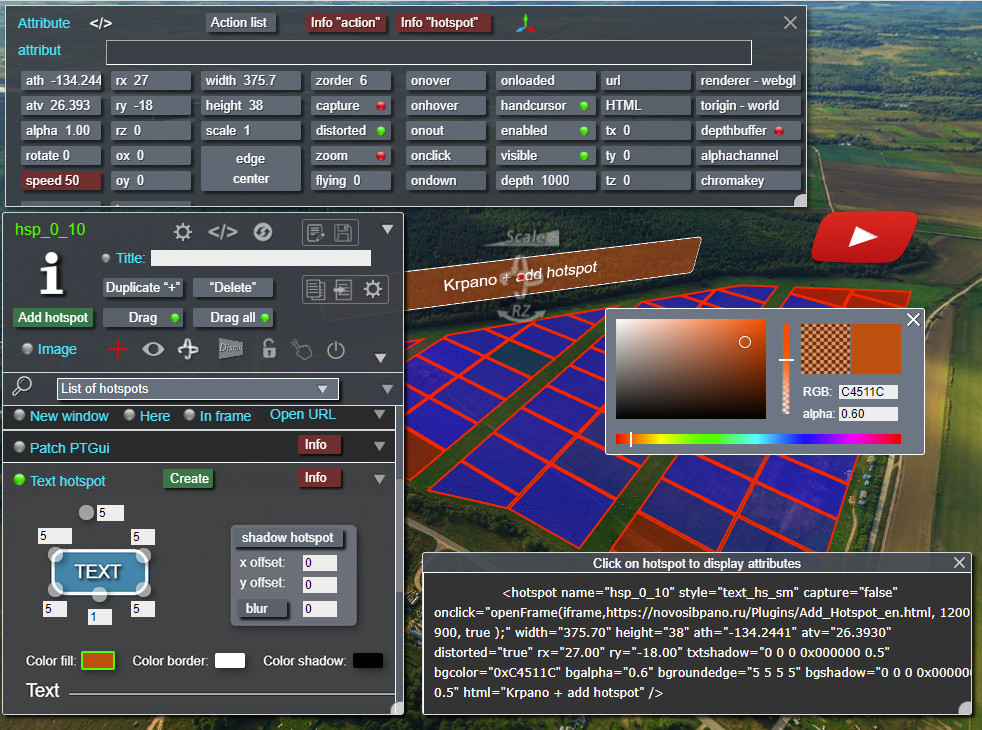
This tab allows you to create and edit text hotspots. Detailed information about the
attributes of the text hot spot is
here .
All Windows with digital values allow you to enter parameters from the keyboard, insert,
copy. As you enter, press " Enter".
Create text hotspot - create a text hotspot with default settings.
Panel of change of radius of corners and thickness of borders.
The change in all radii - hover over upper average round point, hint "all round " will appear and button will become green. Press the button and move the cursor to the right (increase the radius of all corners) or to the left (decrease the radius of all corners). The angle radius value will be displayed next to the button.
Changing the radius of each corner - opposite each corner is a similar button. It changes the radius of the corresponding angle by the same principle.
Changing the thickness of the border - the button is located at the bottom of the border. The principle of changing the thickness of the border
is the same as changing the radius of the corners.
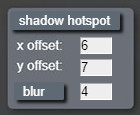
Panel for changing the parameters of the hotspot shadow.
Shadow hotspot - click on the button and move the mouse without releasing
- the shadow of the hotspot will shift accordingly.
X offset - displays the value of the shadow offset along the x axis.
Y offset - displays the value of the shadow offset along the y axis.
Blur - press button and, without releasing, move mouse to right (increase
blur of shadow), to left (decrease blur of shadow).
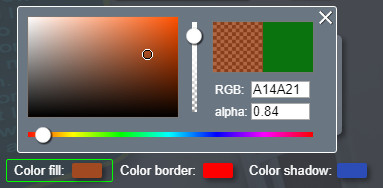
Changes in color and transparency.
Color fill - fill color hotspot.
Color border - border color hotspot.
Color shadow - color hotspot shade.
Clicking the button opens the color and transparency editing panel.
Clicking on the hotspot displays its value in the upper right square, the color is displayed
in the left square.
Clicking on the right box returns to the original spot color.
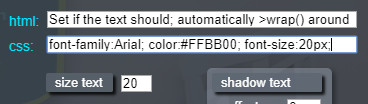
Text
Html - enter the text displayed in the hot spot. You can use multiple HTML
tags, simple CSS styles, or tags to generate text.
Css - text style. Leave a space between the colon and the "color" and
"font-size" parameters!
Size text - change height of text.
Shadw text - is the same panel as Shadw hotspot, only the
parameters are applied to the text shadow.
Text indent changes.
Padding - four buttons for changing indent text on four sides.
Change text color and shadow.
Color text - change text color.
Text shadow color - shadow color change.
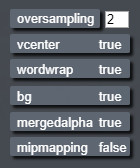
Additional settings.
expand the panel, grabbing the lower right corner, the buttons of additional parameters will
open.
oversampling - increase the scaling of the internal purpose of bitmap rendering by using this over-sampling factor for text with a higher resolution (clear).
textalign - text positioning. 9 options - lefttop, left, leftbottom, top, center, bottom, righttop, right, rightbottom.
vcenter - vertically center the text within the given height of the plugin.
wordwrap - set whether the text should be automatically moved to new lines (below) if it does not fit in the current line.
bg - turn on/off the background.
mergedalpha - By default, the alpha transparency of the background will also be applied to the border and shadow. By disabling this option, you can display the border and shadow with their own and independent alpha transparency.
mipmapping - enable mipmapping - allows you to minimize anti-aliasing effects when displaying text as a scaled-down element.
interactive - When enabled, direct mouse and touch interaction with the contents of the text field is possible.
editable - When enabled, the user can click on the text field and edit it.
This tab allows you to create and edit polygonal hotspots. Detailed information on the
assignment of polygonal hotspot attributes
here .
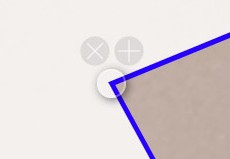
Create and edit - mode of creating and editing polygonal hotspots. Active
- red button.
To turn the mode on or off, press the button or the "E" key, start and finish drawing the
hotspot - press the "space bar",
to create a point - click with the left mouse button.
In the edit mode, click on the hotspot - there will be nodal points at the corners. Grabbing
the point, you can move the angle.
When you hover over a point, two buttons "+" (create point) and "x" (delete point)
appear.
There are two tabs in the panel Default settings and Hotspot.
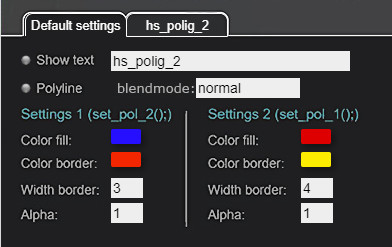
Bookmark "Default settings"
Here you can configure the default settings (polygon hot spots style). These parameters will
be applied to newly created hotspots.
Show text - pop-up text when hovering over the hot spot. enter if
necessary. By default, the name of the hot spot is displayed.
If the text is not needed - remove from the line.
Polyline - polygon or polygon line creation mode.
Blendmode
- the blending mode.
The following parameters have two States and are divided into two columns. The first
state is the default, the second state can be applied to
the hotspot when hovering, clicking etc. and therefore have the installation code
set_pol_1(); и set_pol_2();.
By default, the second parameters are set on mouse hover - onover="set_pol_2();"
and when the mouse is removed from the hot spot onout="set_pol_1();" Settings 1 - the parameters of the hotspot 1. Installation code
set_pol_1();
Color fill - fill color. Click on the color indicator to open the
color and transparency settings panel.
When you click on the hotspot, it becomes active and the name of the selected hot spot is
displayed in the bookmark name.
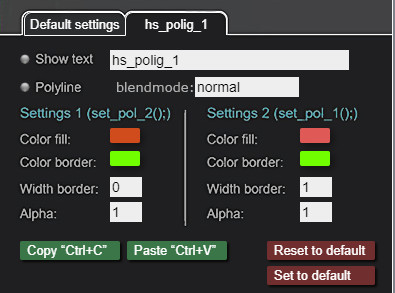
Here you can configure the parameters of the created hotspot. These parameters will be
applied to the selected hotspot.
This tab has the same settings as Default settings, with four more
buttons added on it.
Copy "Ctrl+C" - copy the parameters of the selected hotspot. Keys
"Ctrl+C".
Paste "Ctrl+V" - insert parameters into the selected hotspot. Keys
"Ctrl+V".
Reset to default - reset settings to default.
Set to default - to set the hotspot as your default.
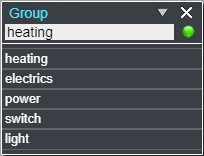
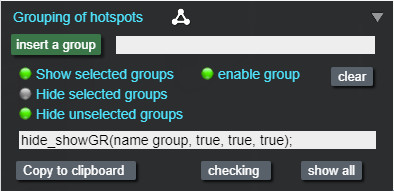
This tab allows you to combine the hot spots into groups and create a code to show or hide
the hotspots of this group.
- Open the panel for assigning a group to a hotspot.
Click on the hotspot to activate it.
Enter the name of the group in the line or select it from the list below if the
groups were created earlier.
Click on the round indicator to the right of the line - the hot spot will be
assigned to this group, the indicator will turn green.
If the hotspot already belongs to the group, then when you click on this hotspot, the
group name is displayed in the line.
Expand the grouping tab by clicking on the triangle to the right in the tab.
insert a group - click on the hotspot or select a group from the list in
the group assignment panel, then click this button, the corresponding group will appear
in the row opposite.
It is possible to add several groups to the list.
It is possible to enter the group name manually in this line.
Show selected groups - show group hotspots.
Hide selected groups - hide group hotspots.
Enable group - disable group hotspots.
Hide unselected groups - hide hotspots of other groups.
Clear - Clear the group input line.
The line below shows the code, which you can assign, for example, to click on a button.
Copy to clipboard - copy the code to the clipboard.
Checking - Check. Click to check how the code works.
Show all - show all hotspots of all groups.
Attention!
The group name must not contain the name of another group! gr_1...gr_12 - incorrect. gr_01...gr_12 - right.
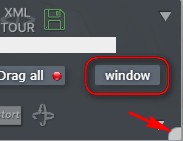
To select files, a window opens by default (with thumbnails or a list), previously located in the corresponding folders of the plugin.
This window does not work on all devices!
Change the way files are selected:
Grab the triangle at the bottom right to expand the panel, the "window" button will appear.
Switch this button to "explorer" and when you select a file, a standard explorer window will open.
HideShowHotspot(); - toggles the visibility of all the hotspots created by
the plugin. Set it to any button or other action.
FlyoutSM(); - smoothly displays the hotspot to the center of the screen
without distortion. Set the action to a hotspot, for example - onclick="flyoutSM();"
Example:
openFrameAdhs(html,get(data[data_html].content),400,300,true);
- open HTML from data.
Example.
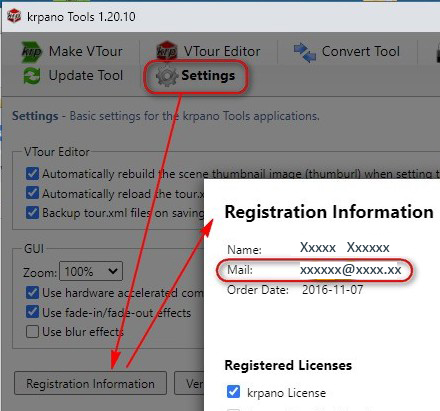
You can try the demo version of the plugin with your own projects. This is a fully working
version that has a time limit. Send me the email that is specified when registering your krpano.
This is necessary for activations plug-in!
Send by email novosibpano@yandex.ru request and I will send a link to download the
archive with the example and the plugin.
Plugin cost is 51 EUR.
To purchase, select the payment option below.
Send me the email that is specified when registering your krpano.
This is necessary for activations plug-in!
Pay-Pal payment
Send your Pay-Pal address to novosibpano@ya.ru and write the name of the plugin,
I will send you an invoice for payment via Pay-Pal.
Or transfer the amount to Pay-Pal novosibpano@ya.ru and indicate the name of the plugin and the registration email address of your krpano.
If you have a PayPal account, send me the address, I will issue an invoice via PayPal.
If you have questions about the purchase of a plug-in or have difficulties with payment -
send me an email at novosibpano@yandex.ru. I will surely answer! You can also
use the feedback form (in the lower left corner of the site).
Plugin is provided "As Is" without warranty of any kind, either express or implied,
including any
warranty of quality, merchantability, or fitness for a particular purpose. In no event will
author of plugin be liable for loss of data,
costs of procurement of substitute goods or services or any special, consequential or
incidental damages, under any cause of action and regardless
of whether or not plugin author have been advised of possibility of such damage. This
limitation will apply notwithstanding any failure
of essential purpose of any limited remedy provided herein. In any event plugin author will
have no liability arising out of this agreement.


 Create a hotspot and activate it by clicking on it (a red dot will appear).
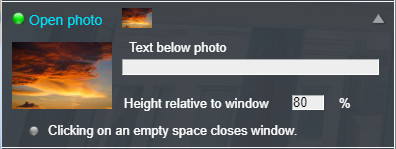 Pre-place the photos in a folder add_hotspot/photo/.
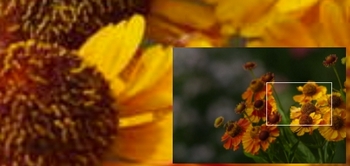 When you hover over the image, it is zoomed in by rotating the mouse wheel. The zoom occurs
relative to the cursor position.
If the photo is larger than the viewing window, then a thumbnail of the photo with the selected
viewing area will appear in the lower right corner.
By shifting the viewing area, the photo moves accordingly.
The photo is moved with the mouse or finger on mobile devices.
When you hover over the image, it is zoomed in by rotating the mouse wheel. The zoom occurs
relative to the cursor position.
If the photo is larger than the viewing window, then a thumbnail of the photo with the selected
viewing area will appear in the lower right corner.
By shifting the viewing area, the photo moves accordingly.
The photo is moved with the mouse or finger on mobile devices. 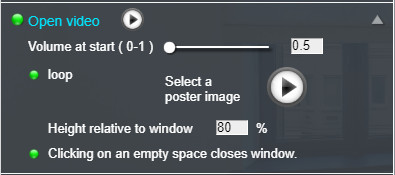 Pre-place the video file in a folder add_hotspot/video/.
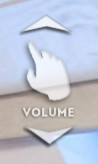
 Pre-place the video file in the add_hotspot/video/ folder.
 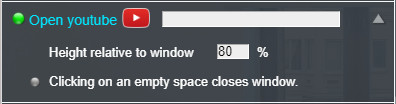 Create and configure a hotspot.
Activate the tab by clicking Open youtube.
Create and configure a hotspot.
Activate the tab by clicking Open youtube.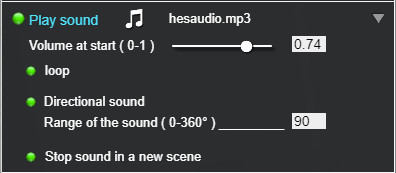 Create paired audio files, for example "sound1.mp3" and
"sound1.ogg", browser will automatically select
Create paired audio files, for example "sound1.mp3" and
"sound1.ogg", browser will automatically select
 During audio playback, a sound control panel appears.
 This tab allows you to ideally place part of image (pixel per pixel) extracted from
panorama.
This tab allows you to ideally place part of image (pixel per pixel) extracted from
panorama.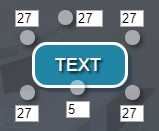
 Text
Text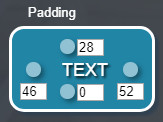 Text indent changes.
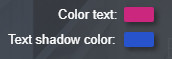
 expand the panel, grabbing the lower right corner, the buttons of additional parameters will
open.
expand the panel, grabbing the lower right corner, the buttons of additional parameters will
open.