


Grouping scenes v1.1.
HTML5. krpano-1.20.
Example in the 3D tour. Press the E + G keys to open the edit panel.
Features
- Combine panoramas into groups and create a list of groups.
- Group icons are created automatically.
- Set your own icons for each group.
- Change the size of icons.
- Make captions for thumbnails.
- Change the list positioning parameters.
- Change the design of the list(there are several preset options). You can create your own design style.
- Easy connection.
- Does not require editing the code in XML.
An example of creating a list of groups.
YouTube
How to connect.
In the folder with the tour in the folder "plugins" there must be a file
"combobox.xml"
Place the "scene_groups" folder in the root folder with the tour.
The connection vtourskin.xml must be higher than plug-in connection.
The connection to the file "tour.xml":
<krpano >
    <include url="skin/vtourskin.xml" />
    <include url="scene_groups/plug_gr/grupp_scene.xml" />
    .
    .
 </krpano>
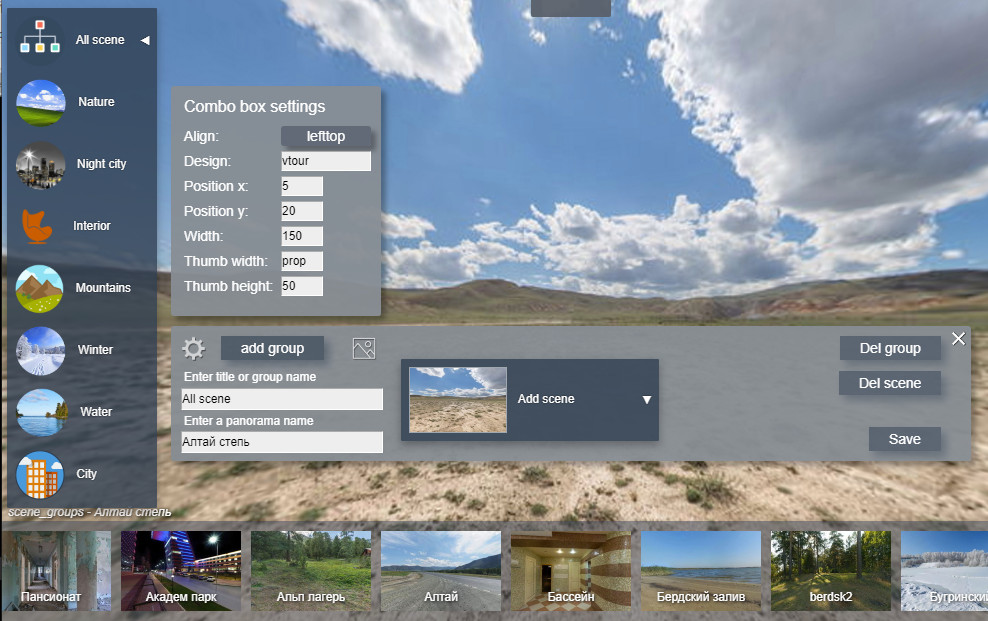
Grouping scenes and creating a list.
Run a virtual tour in the browser. Press keys "E+G" - the plugin panel will open.
Select the scene, that you want to be in the first group, that you create. Press the button.
 Add group - creates a group. Sets the icon of the current scene in the
group.
One selected scene appears in the thumbnail bar.
To select the next scene to create a new group, click on the title of the list and all
the tour scenes will appear in the thumbnail bar.
Add group - creates a group. Sets the icon of the current scene in the
group.
One selected scene appears in the thumbnail bar.
To select the next scene to create a new group, click on the title of the list and all
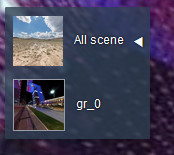
the tour scenes will appear in the thumbnail bar.At the first start, a list is created. The default title of the list title is "All scene". By default, the title icon sets the thumbnail of the first scene of the tour. A group is created in the list. The name of the first group by default "gr_0".
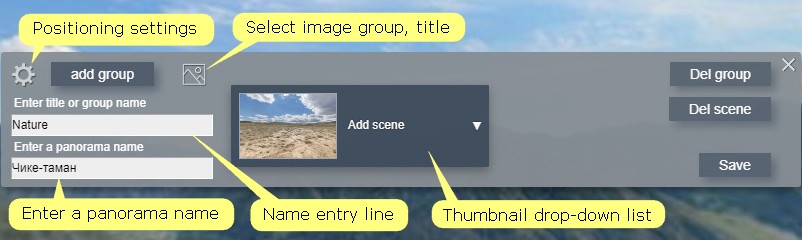
Enter a panorama name - enter the panorama caption that will be displayed on thumbnails.
Name entry line - click on the title or group, the name will appear in the line-rename and press "Enter".
Select image group, title - if necessary, select your group or title icon image. Pre-place the icon images in the folder "scene_groups/icon/". Click the button to open the explorer. Select an image from a previously specified folder.
Thumbnail drop-down list - a list of all the scenes opens, clicking on the thumbnail adds the scene to the group that currently active.
Del group - select a group from the list, click the button - the group will be removed from the list.
Del scene - select a group from the list, select a scene in the thumbnail bar, click the button - the scene will be removed from the group.
 Positioning settings - opens the panel for positioning the list on the
screen.
Positioning settings - opens the panel for positioning the list on the
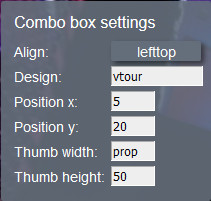
screen. Align - select a screen binding. There are 9 positioning options.
Design - enter the name of one of the preset design options "default", "rounded", "classic", "glas", "vtour".
Pozicion x - offset on the x-axis relative to the anchor point.
Pozicion y - offset on the y-axis relative to the anchor point.
Tumb width - set the width of the group icon in pixels.
Tumb height - set the height of the group icon in pixels.
If the width and height of the icon are not proportional to the image size, then the image will be deformed. To preserve the proportions of the image, enter in one of the values "prop".
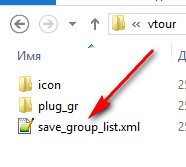 Save - save. Explorer opens, specify where to save the file.
"scene_groups/save_group_list.xml"
reboot browser - the created group list will appear in the tour window.
Save - save. Explorer opens, specify where to save the file.
"scene_groups/save_group_list.xml"
reboot browser - the created group list will appear in the tour window.
Additional information.
Design styles "combobox" are spelled out in the file
"scene_groups/plug_gr/combobox_design.xml".
You can change the style settings or create your own and type in the line
"Design".
Name of the layer "combobox" - cb_group_sc.
You can specify actions that can control the visibility or position of the list of
groups, for example:
onclick="switch(layer[cb_group_sc].alpha,1,0);
Toggle visibility of list.
Purchase plugin.
Test the plugin using this
link.
You can download the plugin example at this link and try on your tour.
This is a fully working version, the difference - the inscription "Demo"
You can purchase the plugin by paying by the methods indicated below.
The archive for download will be sent within 24 hours after payment is received.
I will send you a link to download the plugin in 24 hours.
Updates are free!
If you have a PayPal account, send me the address, I will issue an invoice via PayPal.

If you have questions about the purchase of a plug-in or have difficulties with
payment - send me an email at novosibpano@yandex.ru. I will surely answer!
You can also use the feedback form (in the lower left corner of the site), or
leave information in the "Comments" section.
Changes.
Version 1.1
- The plugin works with version 1.20 of Krpano.
- Added caption function for script names.
- You only need to connect group_scene.xml and don't need to change vtourskin.xml.
- The width of the combobox is set manually.
Version 1.0
Notice.
Plugin is provided "As Is" without warranty of any kind, either express or implied, including any warranty of quality, merchantability, or fitness for a particular purpose. In no event will author of plugin be liable for loss of data, costs of procurement of substitute goods or services or any special, consequential or incidental damages, under any cause of action and regardless of whether or not plugin author have been advised of possibility of such damage. This limitation will apply notwithstanding any failure of essential purpose of any limited remedy provided herein. In any event plugin author will have no liability arising out of this agreement.