


Plugin "Layers editor" for krpano
Features
- Change the basic parameters of the layer positioning.
- Change the size of the layer, curb, shadow, rounding corners, etc.
- Ability to visually change the tone, saturation, brightness and transparency without third-party software, developed a color module for the layer, curb, shadow.
- Changing the positioning parameters.
- Ability to work with pixels and percentages, use the function of "prop".
- Ability to visually control the result during changes. Variable parameters are immediately transferred to the layer.
- Ability to transfer the layer with the mouse.
- The original system for changing parameters, there is no accumulation of buttons.
- Ability to enter parameters from the keyboard numbers, percentages 16th code for color.
- Output parameters to the console with the ability to copy.
- The ability to copy parameters of all changed layers at a time, with saving to a separate configuration file.
Control panel.
The editor is a panel with inside buttons for changing the parameters of the hotspot. For
convenience,
the panel is moved by the mouse inside the preview window. By clicking on the top of the panel
(with a triangle), it collapses.
Inside the panel there are drop-down buttons, in them are grouped the adjustments of the color
parameters, the width of the border, the radius of the rounding of the corners, the work with
the shadow.
The lower three buttons are used to change the speed of adjustment of parameters and for
saving.
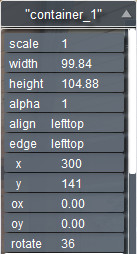 scale - rescaling.
width - change of width (pixels, percent, prop).
height - change of height (pixels, percent, prop).
alpha - change of transparency(from 0 to 1).
alight - positioning the anchor point in the viewport (9 positions).
edge - positioning the anchor point in the layer itself (container, image) (9 positions).
x - offset from the anchor point in the viewport along the x axis (pixels, percentages).
y - offset from the anchor point in the viewport along the y axis (pixels, percentages).
ox - displacement along the x-axis (pixels).
oy - displacement in the y-axis (pixels).
rotate - rotation (in degrees).
The last 4 buttons highlighted with a white frame are drop-down tabs. When expanding the tabs, the buttons are scrolled with the mouse wheel or moved by the slider on the left of the panel.
Drop-down button for color change:
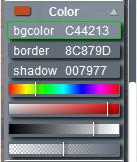
Select the item to edit its color settings and transparency, by clicking on one of the buttons:
bgcolor - container background selection (FFFFFF).
border - curb selection (FFFFFF).
shadow - shadow layer selection (FFFFFF).
on the appropriate button:
Buttons for changing color settings. There are risks that show the relative value of the
parameter.
1. Changing the color (tone).
2. Changing the saturation. The shift to the left changes the saturation to 0, i.e. the
color becomes gray (R = G = B).
By default, the output from gray occurs by decreasing the value of R, the values of G and B
remain unchanged.
After the appearance of the difference between R and G, B, it becomes possible to change the
color (tone).
3. Change the brightness. From 0 to the maximum.
At zero brightness (000000) it is necessary to lift it to the right, the resulting gray color
can be output in color by raising the saturation.
4. Changing the transparency.
Clicking on the corresponding button selects the editing element (background, border, shadow),
after selection you can adjust the parameters of the element
(color, saturation, brightness, transparency).
Curb width button:
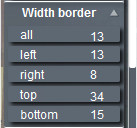
all - changes the width of the borders at the same time on four sides. If the sides are initially of different sizes, the width of the border on the left side is taken as a basis (the width of the other borders becomes equal to the left). The remaining buttons change the width of the curbs according to the sides, respectively.
left - border on the left (pixels).
right - border to the right (pixels).
top - border from above (pixels).
bottom - border from below (pixels).
The revealing border radius button:

all - changes at the same time all curves of corners of a container. If initially radiuses of the different size, the curve of the left top corner is taken as a basis (radius of other corners becomes equal left top). The remaining buttons change the radius of the curvature. lefttop - radius on the left (pixels).
righttop - radius on the right (pixels).
rightbottom - radius from above (pixels).
leftbottom - radius from below (pixels).
Drop-down button shadow:
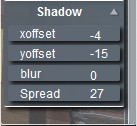
xoffset - indentation of the shadow along the x-axis (pixels).
yoffset - indentation of the shadow along the y-axis (pixels).
blur - shadow blur.
spread - shadow size.
Three bottom buttons:
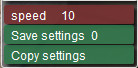
Speed - change in the speed of adjustment of basic parameters from 0 to 10.
Save settings - save changed layer parameters for later copying
Copy settings - output modal window with the data of the parameters of the saved layers for copying (Ctrl + C) and inserting into the settings file Param_set.xml
Preparing the layer for editing.
In the edited layer or in style of a layer you need to write: ondown="editLSM();" or add editLSM(); in the existing ondown.Example:
    <layer name="container_2"  type="container" keep="true"  enabled="true" handcursor="true"  bgcapture="true"
	       align="left" edge="center" alpha="1" scale="1" width="80.00" height="80.00" x="50" y="0"
	       ondown="editLSM();"
    />
How to connect.
To connect the editor, put the folder "edit_layer" in the root folder with tour.Example of connecting the plugin in the main xml:
    <krpano .... >
    <include url="edit_layer/edit_layer.xml" />
    <include url="edit_layer/Param_set.xml" />
    .
    .
    </krpano>
Work with the editor.
How to edit a hotspot.
Select a layer by clicking on it. The name of the layer being edited is displayed in the top
panel. The editable layer
can be moved with the mouse and the positioning coordinates will be immediately displayed on the
corresponding buttons.
Parameter changes occur by pressing the left mouse button on the button and shifting to the left
(decrease the parameter),
to the right (increase the parameter). The further you pull the mouse from the point of
pressing, the faster the parameter changes.
Changes are immediately applied to the layer and you can visually control the result.
To change the positioning, pressing the button. A panel opens on which 9 buttons are located
(positioning options).
Inside the edit panel there are four drop-down panels - the color editor, the curb width editor,
the corner rounding editor, the shadow editor.
Clicking on the parameter setting button highlights it with a green border and then the
parameter is entered from the keyboard (the numbers on the right side of the keyboard).
All digits, percentage (button "5" of the upper row of the keyboard) and the hex code for
entering color parameters are available, understands the parameter "prop".
After typing the parameter for input, press "Enter", with an input error, the "Delete" key
clears the button.
Saving the changed parameters.
There are two options for saving the changed parameters:
1.
Open the console (the "O" key). Click on the edited layer - the current layer parameters will be
displayed in the console.

Select the required parameters with the mouse, copy and replace the changed layer parameters
with those copied to the file tour.xml.
2.
Click on the edited layer, click on the "Save settings" button in the panel. The button displays
the number of layers with the saved parameters.

After saving all editable layers, click the button in the "Copy settings" panel. A modal window
opens with the content already selected.
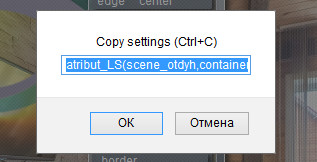
Copy the contents of the "Ctrl + C" window and paste it into the file Param_set.xml

Reboot the tour window - changes are accepted.
If you save the settings for the second variant, you can not change the same parameters in the
file "tour.xml", they will be overwritten to the saved ones earlier.
The new changes need to be kept on the same principle. If you delete the file "Param_set.xml"
all the settings will be initialized.
In order to display the last modified parameters in the console, click on the corresponding layer.
The file "param_set.xml" stores the parameters of the changed layers. When you start from this file, new layer values are set, the main "tour.xml" does not change. All parameters that are adjusted in the editor
are updated even if they were not edited. The other parameters of the layer ("enabled", "keep", "handcursor", etc.) are not affected and edited in the file "tour.xml"
The layers edited in the file "tour.xml" at startup will change to the settings from the file "param_set.xml"! If you delete the file "param_set.xml", then the layer will take values from the file "tour.xml"!
It is important to save the settings before exiting the scene, otherwise the settings will not be saved.
If you used the "param_set.xml" file, then when you finish working on the layers, you must leave it with the "edit_layer" folder.
Purchase plugin.
Test plug-in by following this link.You can purchase the plugin by paying by the
methods indicated below.
The archive for download will be sent within 24 hours after payment is received.
Updates for this plugin are free!
If you have a PayPal account, send me the address, I will issue an invoice via PayPal.

If you have questions about the purchase of a plug-in or have difficulties with payment -
send me an email at novosibpano@yandex.ru. I will surely answer!
You can also
use the feedback form (in the lower left corner of the site), or leave information in the "Comments" section.
The archive includes:
Working example of use.
In the example folder "edit_layer" with the files of the editor in which:
In the example folder "edit_layer" with the files of the editor in which:
- edit_layer.xml (executing file. closed code).
- Param_set.xml (to save the settings).
- triangle_ar.jpg(icon).
Notice.
Plugin is provided "As Is" without warranty of any kind, either express or implied, including any warranty of quality, merchantability, or fitness for a particular purpose. In no event will author of plugin be liable for loss of data, costs of procurement of substitute goods or services or any special, consequential or incidental damages, under any cause of action and regardless of whether or not plugin author have been advised of possibility of such damage. This limitation will apply notwithstanding any failure of essential purpose of any limited remedy provided herein. In any event plugin author will have no liability arising out of this agreement.
Example of use.
Arrangement of points with radars on the floor plan.
YouTube
This example creates a simple style for points on the plan. Inside the layer with the
floor plan, 6 points are created to which transitions are assigned to the corresponding
scenes
and radar by clicking on the point.At these points, an early created style is
prescribed.
Editing is divided into two stages:
1. Change the appearance of the point.
The appearance of the point is created using the editor - rounding, borders, shadows of
color. Changes are saved by
the first method - the changed parameters are
copied from the console and inserted in the style of points,
all points take a changed form.
2. Arrangement of points on the plan and preservation.
The points move apart on their places on the plan with the mouse; for precise
adjustment, you can use the coordinate change buttons in the "x" and "y" panels. Since
the radar is
the child of the point, then rotating the dot layer with the "rotate" button in the
panel, it rotates with it, thus setting the direction
Radar on the plan in accordance with the view without additional editors.
Saving by the second method - saving new point
parameters, copying from the modal window and inserting into
file "Param_set.xml". Reboot the preview window - the changes are accepted. All points
are arranged and the direction of the radar is established.
Changes
Version 1.0
Example